Monday, July 31, 2017

PUPPY FOR ADOPTION (INDIA) - ADOPTED

July 31, 2017 0
Hi, guys!
I'm currently fostering an orphan mix breed puppy. Her name is Snowy and she is about 5 weeks old.
She is very cute, is almost potty trained, and knows how to sit on command!
If you live in Mumbai or near Thane, please consider adopting this princess!
Below is my Facebook post on the same, click on it and message me on facebook, or DM me on Instagram (@blackandwhiteandwise) for details if you are interested! If you would like to be updated you can follow my Instagram account as I'm posting tons of pictures and videos on my story and feed.

Please share this post so that more people can be reached as I can only keep her for few weeks!


Update: Puppy got adopted! Thanks to the family who decided to give her all the love in the world! :)

Friday, July 28, 2017

10 Tips on How to Come Up with More than Enough Blog Ideas - Blogging 101

July 28, 2017 0
When you start out, it's easier to come up with ideas but once you write a few posts you start running out of them...Here's a quick and simple guide on how to come up with blog post ideas!

how to come up with more than enough blog post ideas


1

What I do is, when I get one idea I try to think of variations or similar ideas and write them all down at once. It's like a boost of ideas.
2
Usually, when you're in bed at night and can't sleep, you get a lot of ideas. WRITE THEM! You think you'll recollect your thoughts in the morning but that usually doesn't happen easily, at least in my experience.
3
Go on YouTube, see what's trending. Look at what's in your subscriptions because what you like to see could also be what you enjoy writing about whether it's DIYs or social media growth tips, etc.

4
Google it. Google blogs similar to yours. For example, if you have a lifestyle blog then search for other lifestyle blogs and try to vary what they post a little bit so it doesn't seem like you are copying them (if that is something you would like to avoid). Many times you will also think of points not mentioned in that post so you could make up a completely original piece of work.

5
If you find ideas on the web, don't read the blog post from where you got the idea. Just read the title. Because you may get influenced and end up writing the same points. If you just read the title then your own thoughts will come up first. They could still be the same but you may get a few/a lot of new ones.
6
Make spider diagrams/bubble flow charts/whatever you prefer to call them. If even two things on your chart have a few differences, you have two separate blog post ideas from the same topic! You can decide if you want completely stand alone topics or not. However, if you have related topics you could put in links and self-promote your other posts on each post and maybe even get more views!

7
Keep your real life in mind, get inspired by things around you. This may be harder if you are pursuing a blog that isn't "lifestyle" or something like that, but it may still work!

8
If you are "DIYing" something, rearranging your bedroom, revamping something, etc all these things could become blog posts. If you found out a way to get more YouTube views, make it into a blog post! If you are experimenting with methods to increase you Instagram following, and it works, make it a blog post (Click Here to see how I increased my new Instagram account's following by more than 500 followers in less than a month!)

9
If you find a blog post/article about a topic and you don't agree with it or have more opinions/things to say because you feel the article doesn't cover all the points or doesn't justify the topic, you can write about that topic. Make sure not to copy from other people! Plagiarism is a big no-no even if you change words/sentence syntax of the other person's work!

10
Have different series if your blog isn't specific (e.g. my blog is just simply a "lifestyle blog". I haven't made it a very topic-specific blog). This way you don't have to worry about running out of ideas for that one theme you chose. You can write on different topics and have a lot of ideas for each topic. However, if you have expertise on one topic and that's what your blog is about, then go for it. In that case, tip numero uno would be more helpful than this one.

Tuesday, July 25, 2017

8 Methods you can use to effectively plan your day

July 25, 2017 0
Disclaimer: This post is not sponsored by any of the mentioned companies. All images are taken by me and are not to be stolen/copied/used in your content without my permission.

Planning is a key part of my life and it has been for a long time now. I have tried and tested different ways of planning. I've had different "planning phases" and so I have gathered this compilation of different ways you can plan your day!

Don't have the time to read this entire blog post? No worries! Watch my video below on the same topic (you can even speed it up if you want):


1. The Simple Square


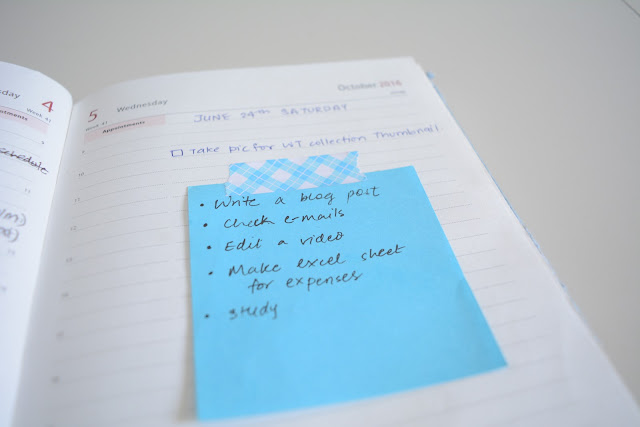
For those who want it to be quick and over with, I assume you don't want to look too far into this blog post either and hence I will address you first! The fastest and easiest way to plan has to be using sticky notes or those colored squares (basically the sticky notes without the "sticky"). It's great to have a small pad of those on your desk or your work-space to quickly write down a list of things you have to do for the day or the next day as and when you remember them. This is a simple method and great for you if you don't plan everything in a detailed manner and want something you can slip into the back of your phone case or in your wallet/purse pocket if you need it on the go because not everyone has a purse/space in their purse and not everyone wants to carry an entire planner everywhere they go.
Keep it on your desk, stick it to the wall, use it as a bookmark in your textbook, etc, etc.


2. The Digital Dummy


First of all, I mean no offense by the above title (I just couldn't think of anything else).
If you use your phone all the time then this might just be something to put that exposure to radiation to some good use (sort of?). If you're a simple person, use your phone memos! I do that all the time but not exactly for planning; I use it when I get ideas and I'm not at home or at arm-distance to my physical paper planner. But you could definitely use it for planning and then delete the memos when you call it a day. If you want something more attractive but still in memo form, download an app like Google Keep or anything of that sort. For those who want to go the extra mile, I strongly recommend a phone To-Do List app/phone planner app. There are some really great ones out there that aren't only functional but have a great appearance so you don't feel like you're stuck in time. Any.Do is one of my favorites and I used it for a long, long time (till I realized that I preferred a physical planner over a digital one). 
Any.Do

Apps like Any.Do are great because you can set the exact time and date for your "to-do's" and the app will give you reminder notifications. I even like Onceaday because it's kind of like the digital version of the habit tracker you see in people's bullet journals. 
Onceaday

The main pros of these apps are that they are simple to use, remind you about deadlines unlike your physical planner (if you don't read it every day to make sure you don't have incomplete assignments/tasks, you could end up forgetting to do them), and I guess you don't waste paper if you like to be really environmental-friendly. It's a compact system that you don't have to flip through to find the page, it isn't messy because you can delete a task or postpone it to another day without having to scribble it off and it looks sleep and classy (because it's in a typed font, of course).


3. Digital Dummy Part 2


Alternatively, you can use apps/google chrome extensions/google calendar/Excel sheets on your laptop to plan your day. If you only want a monthly view for deadlines/meetings then a google calendar is great for you! Google Keep and Evernote are some widely used apps used on laptops (as well as phones).

4. Erasable & Efficient

You can literally make your own layout!

A whiteboard is what I'm talking about. If you don't have one, it might be a bit of an investment (compared to the free phone app or the sticky notes pad) since you'll need the board, an eraser (but hey, a cloth napkin could work too), and the whiteboard markers, but it's worth it if you know you'll use it often. The best part about having a whiteboard/dry-erase board as your planner is that you are not confined to lines/grids or a preprogrammed interface - you get to choose what the colors will be, what they layout is, and so on. You can use it for planning your home workout routine, make a to-do list, a grocery list - literally anything you want. You can divide your board for different categories if your board is big enough. If you don't want to get the typical whiteboard here's an alternative quick DIY (if you want to put in the efforts):

Get an acrylic glass of the size you desire.
Look up tutorials on YouTube on how to drill the correct screws into the walls and how to correctly drill holes into the acrylic without breaking it.
Put it up on your wall!
OR
Keep the acrylic glass on your desk if the acrylic is small enough/your desk is big enough

This DIY is great if you prefer a more subtle/minimal alternative and you can get the acrylic cut in any shape you want and any size you want to fit its location/your stylistic choice.

The cons of this method, however, are that you are confined to the size of your board and it may not be for you if you are an intense planner.
Intense planners, read ahead.

5. Planning Princess/Prince


You can get these anywhere and everywhere. You just have to make sure you get the right year (lol) and you're all set. Planners come in various sizes and little effort is needed since the basic layout is already printed and there is a yearly and monthly layout already there. Depending on what kind of planner you buy, you may also have a weekly and/or pages for day-to-day planning. If you are a very busy person and need space for your chaotic (but productive) days, then a good, durable planner is a must-have! You can DIY your own planner, but in my case, it didn't look great (chances are yours won't look like a Moleskine either) and it didn't inspire me to plan, in fact, it kind of even drove me away from the idea of planning. Planners can be a bit costly too depending on what brand you get so if it's you first time planning (or first time after a previously failed attempt), you can do one of three things: 1) Go through the other methods on this page and just skip the planner. 2) Get a small planner that isn't of a known brand (so it's cheaper) as a trial planner. You won't feel as bad wasting pages if it's a small/thin one and you can use it as a notepad for something else. 3) Analyze what went wrong the last time you had a planner - what elements you didn't use that caused you to waste most of the book or what elements you needed that wasn't provided. Get a new planner according to your needs. If you need too many custom elements, the next one is for you.

6. The Queen of Planning

  
For those of you like me that are in love with customization and don't mind (maybe even enjoy) putting in the extra efforts to have a functional but also visually pleasing planner, two words: Bullet Journal. If you don't know what a bullet journal is, I only want to know if you have been living under a rock. I know I was until early this year. The bullet journal has transformed my life. Transformed. I've never been as productive and I am so efficient (If you read the next points though, you'll see how I plan my day using an additional technique). Bullet Journals are literally anything you want them to be. They're like the white board I mentioned earlier but with way more pages. These are so diverse and can be taken in so many different directions that I honestly feel that you should do a google or even better, YouTube search on what Bullet Journals are and what types are made by people. For starters, you can watch my Bullet Journal videos below:


You can also click here to see my bullet journal setup post (if you don't feel like/can't watch the video right now!)

7. Combo Pack 1 (What methods I combine)


My combination is for the extreme people out there: Bullet Journal + Daily Planner. Yes, that's right. I'm a maniacal planner (I might need help). I have the case of the Planner Syndrome and hence I combine the most intense forms of planning to have productive days. I like to keep my bullet journal clean and minimal so I use it for monthly and weekly planning and tracking my habits/activities and my daily planner, obviously for daily planning (duh). This combo works the best for me (for now, at least), especially for this month (and the next) since I'm recording & editing videos (visit my YouTube channel by clicking here) and blogging like crazy. I am likely to continue this combination since University life will probably be a more hectic than my current lifestyle and I will need a proper system to keep track of assignments, deadlines, etc. (sticky notes and phone apps just don't suffice in my case)

8. Combo Pack 2 (Another method I use occasionally)


Planner + Squares. I have these moments when I'm super sleepy or have to go out and have these sudden bursts of "Sh!t I have to do this! And that!" and I really don't want to put in the efforts of writing it down neatly (or even in a remotely neat fashion) in my planner. So I just take those sticky-less squares or sticky notes and quickly write down the important tasks that I know I'll forget the next day/by the time I am free to do them. When I have time (i.e. later on) I washi tape the note to my planner so it doesn't look too messy and perhaps even visually acceptable. This is a great combination if you want to use a planner but have moments like the ones described above. It's kind of like an unintentional decorative element to your planner.

That's about all of the methods of planning I can think about right now. If with some miracle 5-10 more ways pop into my noggin, I will make sure to make a part 2 to this one.

I also have a post coming up soon on how I exactly plan my day, so follow my blog (follow button at the top of this page to the right) and stay tuned!
Feel free to comment on and share this post if you liked it! ;)


Sunday, July 23, 2017

Learning new things, Curiosity, Laziness.

July 23, 2017 0
When I moved to India in 2009, I was exposed to a very different environment than I was used to, and with that came a different education system. My parents decided to put me in an international (IB) school as they thought I may not be able to cope with the Indian system of education. IB for younger grades (till 6th I believe) is called PYP (Primary Years Programme) and it is designed to train students to develop a lot of skills like time management, open-mindedness, and so on. The one skill it taught me (more than the others) was probably curiosity - to ask questions. I was already curious somewhere inside me, but it wasn't showing just yet. The curriculum and my teacher brought that out of me and ever since I have been as curious as ever (though I know when not to be as well). To be completely honest, it was my competitive side that got the curiosity out of me. I wanted that 4 (4 was the highest score) on my report card next to "Asks questions in class". In IB, "ask questions" means ask a hell lot of questions related to whatever is being taught.
This trait I have developed sometimes can be a problem, but it may be a good one. I usually have a handful of questions whenever I'm studying something new which makes me google it immediately because I become restless when I don't know something that I want to know. I believe this helps me get better grades sometimes because I clarify the concepts as much as I can.
The problem with me arises when curiosity arises along with laziness. It's an internal battle that goes on forever.

I love learning new stuff. It's always been in my nature. I love the idea of being knowledgeable. I've had teachers who know (what it seems like) everything. I look up to them so much because I aspire to be that; I want to be able to answer anything, even if it's in a brief manner when asked anything whether related to what I do or not. This goes well with my developed curiosity. 

Most of my childhood I knew only 3 languages (and could understand one more) but that was because I was lucky enough to be born in an environment where English is considered the primary language and each parent knew a different language (and one common one as well - the one I could only understand). When I moved to India, I learned Hindi: my 4th language. People sometimes seemed surprised if they showed any emotion when they realized that I knew 4 languages, but to me, it was the norm. "4 languages" is my norm. I decided that I wanted to learn Spanish too and so I installed an app to do so and it's going pretty decent as of now. As I mentioned earlier, I love learning so I really wanted to learn a new language.

When I have questions about the language I'm learning (grammar rules, or anything of that sort) I usually search them immediately or write them down...and then forget about it and forget where it was written (because I'm such a mess most of the times).
It's hard to keep up with "learning" when you are like me and have good days of productivity and then really bad days of not wanting to do anything. It's like being two people, almost. Or rather, it's like having a shoulder angel and devil, both very persuasive.

When I said the Spanish learning was going decent, I kind of lied. I still know my basics but I haven't revised in days and haven't even opened the app recently - it's a long streak of laziness rather than that of learning. My laziness does take a toll on my curiosity because, after a long period of time of being in this weird inactive non-learning phase, my interest starts to fade. Definitely not go away, just fade a little. I have to give myself that extra push (I guess what we call willpower) but laziness is that anchor keeping you from floating and the willpower is like the sword to cut the rope. You can probably see my recent obsession with Pirates of the Caribbean peaking through my writing.

So right now, I'm trying to get back into my active learning stage while writing this post laying on the bed, yawning. I hope that writing this post helps me actually see that this "lazy phase" is real and I don't like it. This post was kind of all over the place, I'm pretty sure. But I think putting into words what I've been denying should help me get back in my game and get the momentum started. Laziness, I don't think, will ever separate from me. I will always have urges to binge the entire day after a day of being super productive and learning a lot. But I think what I need to try to do is increase the days where I love what I'm doing and being curious compared to the lazy days. I just need to use my will power to keep that ratio high.

Wednesday, July 19, 2017

Bullet Journal August Monthly Spread/Setup 2017 - Minimal and Aesthetically Pleasing

July 19, 2017 0
This is my aesthetically pleasing August 2017 Bullet Journal Setup. I decided to continue the same minimalistic and monochrome theme with the elements also having the similar style. I decided to make some minor changes as you will know as you continue reading this post.

Bullet Journal August Monthly Spread

If you'd like to skip this post and watch the setup being made, you can go to the end of this post for my August 2017 Setup video.

Read my previous Bullet Journal posts:


I must admit, my July spread wasn't filled as much as I had hoped, especially the weekly log sections. I didn't really do much and ended up opening my Bullet Journal less often than compared to the month of June. For August, again, I know I will not use the pages much and so decided to try and not waste pages. I created a monthly spread very similar to last month and the month before that. I did, however, add a different element or two and change the look of one of the elements.

Bullet Journal monthly spread august

I decided to keep the calendar layout the exact same with the same dimensions because this particular element and the style has worked very well for me. I highly recommend making this calendar spread if you want to keep track of tasks/events that have particular dates but don't want to make an entire daily log for the one or two words you will write down:

Bullet Journal monthly spread calendar

As you can see above, I wrote "August" (amateur lettering) and decorated only the top part of the page with a simple black and white washi tape that I recently purchased (Click Here to see my Washi Tape Collection).

I added a small title for my monthly goals, monthly stats, and "to buy" (last minute shopping list containing items I couldn't or didn't have the time to buy in July).


Bullet Journal monthly spread

I changed up the style for the daily gratitude section so that I can keep track of it more effectively. In my July Spread, I just put the heading as "Daily Gratitude" and didn't add any dates. This was a problem because I would forget to write in it every day and failed in keeping track of when I write what I'm grateful for and when I don't.

Bullet Journal daily gratitude

Finally, I added my TV Show Tracker to the monthly spread because I know what shows I'll be watching in August and I realized that dedicating one entire page for a TV Tracker (like I did in my Old Bullet Journal Setup) didn't suffice. I watch a lot of TV Shows and one page for one year just didn't do it. I'd rather have my current TV Shows listed on the monthly spread so it's easier for me to see what episodes are left to watch and also so that I don't have to go through finished shows in the future months while trying to find my current ones.

Bullet Journal tv show tracker

On the next page, I added an Activity Tracker and a "How was my day" Tracker. I decided to keep it simple.

Bullet Journal activity tracker

Finally, for this month's setup, I have my Packing List element. If you didn't know already, I'm going to begin my first semester at my University this fall and so I want to make sure I don't forget the important stuff while packing.

Bullet Journal packing list

My August 2017 Bullet Journal Setup Video:

Monday, July 17, 2017

How to make your instagram popular fast! - A simple guide to 500+ free instagram followers!

July 17, 2017 0
With the below tricks and tips, I gained over 500 followers in less than a month. In fact, I didn't even use the below tips to their full potential because I had finals and wasn't able to dedicate a lot of time towards my Instagram. So if you spend time and a little bit more efforts (you can implement the below tips in your free time so you don't feel like you're wasting a portion of your day), you can get 750+ followers in a month's time only! This guide is best if you have just started your Instagram account!


Here's what the below tricks did to my following:
×
In the below screenshots, you will notice changes like a change in my display picture, bio, etc. I assure you that the screenshots are all from the same account. You can visit my Instagram by clicking here to see that all the posts are present, proving that all of the below screenshots are from the same account of mine.
×
I started documenting on May 17th, 2017, as you can see in the screenshot below. I had already started using the tricks below to get around 20-ish followers before the below picture, but let's consider only from this date onward for a proper analysis.
Day 1 - May 17, 2017
 As the one-month mark approaches, I get exactly 500 new followers since Day 1 and more!


I decided to only document till this day (just one day short, not much of a difference) as I had already passed 500 new followers. As you can see the below tricks will definitely gain you 500 new followers if you follow them carefully!

The following methods/tricks and tips are a combination of organic and inorganic ways (completely legal and do NOT contain methods like bots and paid followers - the methods are totally free and will definitely not get you in trouble in any sort of way)
I personally recommend you to use all these tips, but only till a certain point because after a while you will start gaining followers organically without doing much (just maintaining your Instagram account's quality). Enjoy:


1. Follow for follow - Find people with lower follower numbers or similar follower numbers as yours. Do this by going to the explore page on Instagram and use the following hashtags: #newblogger
#newblog
#followforfollow
For me, the hashtag "#newblog" works the best.


2. Try to find and follow people who have the most recent posts under that hashtag because they will most likely be active and follow you back instantly (hopefully!). Recent post = Bingo!


3. Be active and like followers posts so that they don't unfollow you. This isn't going to definitely stop them from unfollowing but it'll make it more unlikely


4. A lot of people will unfollow you after a few days or will follow you (even though you don't follow them) and then unfollow you. Download an unfollow app to unfollow people you follow who've unfollowed you or who never followed you back.


5. Try to find out when most people post in the hashtag you think works best for you. You'll get a lot of people to follow and you'll be done for the day.


6. I recommend following 15-30 people every day if you want 15+ followers every day. You can even follow more if you like but don't forget that Instagram has a limit and you should probably stop after following 100 or so people (I think the limit is either 130 or 160)


7. Initially, I suggest networking - i.e. connecting with other blogs with less than 200 following asking them to follow you back so you can build a base number. That's how I did it. I followed a lot of blogs of similar type to my blog and they followed me back. Build relationships with the nice people you connect, DM them, have conversations, like their photos, and hopefully, they will do the same! 


8. It is also helpful to direct your friends from one account to another if you have two accounts. So if you have a personal Instagram account and are wanting to get more followers on your Public or Blog account, then direct them. Occasionally put up an Instagram story saying "Go follow my other account!" or "new post on my other account, check it out!" and tag your second account so people can easily click and visit it.


9. Quality posts are important! Think of it as, you only "heart" the posts that you like or are visually pleasing. It's the same with others. So post content that you would be inclined to like if it were posted from another account. If you have enough posts like that, people will follow you because "#feedgoals" 


10. Theme! An Instagram theme is way more visually attractive than a feed full of pictures, each with a different filter/look. Try to make your feed more cohesive, this will help you get some organic followers and likes!


11. Use all 30 hashtags that Instagram lets you use! It's the best way to make sure that you reach a wider audience. Make sure the hashtags you use are relevant and related to your niche if you want more likes and follows.


12. Post at Instagram "peak time". You'll definitely get noticed. In my timezone, it is either 10:00 am or 6:30 pm, do some research or just be observant and see when you get more likes. Of course a higher number of impressions and likes could be because you posted something which more people liked, but it could also be the timing. If you post at the correct time, you will get more engagement and more follows!


13. I recommend setting a limit. Once you have a base number of 500-1000 followers I don't that you use this trick because a lot of the people followed you back because you asked them too hence they may not like all your posts. Your followers:engagement ratio could increase (which isn't that great). Hence after your initial goal for a number of followers, try to grow organically - and it will happen, especially if you follow the above step!

Disclaimer: This is not a sponsored post. All images from Unsplash.com

Happy gaining!

Saturday, July 15, 2017

My Washi Tape Collection

July 15, 2017 0
I may not have an insane amount of washi tape, but I may have more than the average (not addicted to planning) person?...


If you didn't know already (from my numerous planning/bullet journal posts here and on my Instagram) I am obsessed with Planning. What may be a bit unknown, however, is my obsession with decorating and using washi tapes. I don't use a lot of color in my Bullet Journal, in fact, I use only black, white, and gray. On the other hand, when I'm using a planner, I like to fill the pages with color and what not.


If you are coming from Instagram, you may say I'm lying because my recent posts of my planner are very plain and minimal too. You are true about the part where I seem to contradict myself but in reality, the planner photos on my Instagram shows the old planner I am currently using for rough planning because I honestly don't have much going on right now. I have a new planner ready to use once my classes at my University begin!

(Disclaimer: This is just a mini-post on my blog and so if you want to check out my detailed guides and detailed planning posts, go back to the homepage of this blog and read some of my other articles!)

Also, Don't forget to follow my blog (button on the top right of this page) and my socials which are also linked on the sidebar to the right of the screen!

Without any more delay, here is my Washi Tape Collection:


Friday, July 14, 2017

50 Questions You've Never Been Asked Tag

July 14, 2017 2
50 questions you've never been asked tag header

  • 1. What's your favorite candle scent?
  • Christmas Cookie for sure. I love any sweet scent. I definitely prefer this over fruity/tropical scents.
  • 2. What female celebrity do you wish was your sister?
  • Selena Gomez and/or Ariana Grande. I've been obsessed with these two since as long as I can remember. Queens.
  • 3. What male celebrity do you wish was your brother?
  • None, it's either a celebrity crush or not interested. 😂
  • 4. How old do you think you'll be when you get married?
  • 25-30, probably? I haven't thought about it much yet. It will happen when it happens.
  • 5. Do you know a hoarder?
  • My past self lol! I used to have stuff from ages ago! I still have a lot of things that are old and sentimental but I'm slowly getting over those and I've already given away or thrown away a lot of my childhood things.
  • 6. Can you do a split?
  • I did one once by mistake because I slipped, but I cannot now for the life of me. I am the least flexible person.
  • 7. How old were you when you learned how to ride a bike?
  • I can't remember exactly but somewhere between kindergarten and 2nd grade. It was in the front yard kind of area of my building during summer vacation.
  • 8. How many oceans have you swam in?
  • Maybe one. I'm not really sure, though.
  • 9. How many countries have you been to?
  • Five - USA, India, France, Switzerland, England, and Belgium.
  • 10. Is anyone in your family in the army?
  • Nope.
  • 11. What would you name your daughter if you had one?
  • Never thought about it but probably a sweet, simple name (so specific 😛).
  • 12. What would you name your son if you had one?
  • Never thought about it.
  • 13. What's the worst grade you got on a test?
  • E (oh god bad memories, bad memories). Please do not ask. I am hoping that one-time incident stays a one-time incident!
  • 14. What was your favorite TV show when you were a child
  • Oh, I had so many. Blue's Clues, Dora The Explorer, Teletubbies. I had a lot when I was a bit old for those shows too. I watched TV all day, every day.
  • 15. What did you dress up as on Halloween when you were eight?
  • I probably dressed up only once as a Devil and I don't think it was when I was eight.
  • 16. Have you read any of the Harry Potter, Hunger Games or Twilight series?
  • No, but I have only watched the Harry Potter series because a friend forced me too and I kind of liked it but was very confused because I hadn't read the books. She explained it to me later so it's all clear now.
  • 17. Would you rather have an American accent or a British accent?
  • I have an american accent and I prefer it but I wouldn't mind having a British one either.
  • 18. Did your mother go to college?
  • Yes.
  • 19. Are your grandparents still married?
  • One grandparent on each side has passed away so no.
  • 20. Have you ever taken karate lessons?
  • Never, I was told not to do karate by the doctor because of my medical condition.
  • 21. Do you know who Kermit the frog is?
  • Yep. But I don't remember much... just from memes and pictures on the internet
  • 22. What's the first amusement park you've been to?
  • Probably Six Flags?
  • 23. What language, besides your native language, would you like to be fluent in?
  • Spanish. In fact, I'm learning it right now!
  • 24. Do you spell the color as grey or gray?
  • I've lived in USA and India, so I'm super confused all the time and probably just take turns between the two.
  • 25. Is your father bald?
  • Who came up with these questions?! 
  • 26. Do you know triplets?
  • No, but I confuse people who don't even look alike so that would be a tough situation for me.
  • 27. Do you prefer Titanic or The Notebook?
  • I've only seen the Titanic when I was a bit younger but I don't think I would prefer either.
  • 28. Have you ever had Indian food?
  • For 7 years straight now, yes.
  • 29. What's the name of your favorite restaurant?
  • Taco Bell. Don't judge me.
  • 30. Have you ever been to Olive Garden?
  • No, but I really want to.
  • 31. Do you belong to any warehouse stores (Costco, BJ's, etc.)?
  • Costco.
  • 32. What would your parents have named you if you were the opposite gender?
  • I honestly have no idea but maybe what they named my brother?
  • 33. If you have a nickname, what is it?
  • Nikki or Niks. My name is pretty complicated and it's hard to have a nickname.
  • 34. Who's your favorite person in the world?
  • My best friend. 😊
  • 35. Would you rather live in a rural area or in the suburbs?
  • Suburbs for sure. As much as I love peaceful and quiet, I need stuff near me and need the stuff to be accessible. And sometimes I let go of wanting to be a minimalist and need those 10 items from that super cool art store.
  • 36. Can you whistle?
  • Yep.
  • 37. Do you sleep with a nightlight?
  • I cannot sleep with any light on.
  • 38. Do you eat breakfast every morning?
  • No. Sometimes I don't wake up in time for breakfast. 😜
  • 39. Do you take any pills or medication daily?
  • I have some hair vitamins prescribed to me for hair fall currently.
  • 40. What medical conditions do you have?
  • I have only one kidney. I had a kidney reflux when I was one or two years old.
  • 41. How many times have you been to the hospital?
  • A lot, because of my kidney thingy.
  • 42. Have you ever seen Finding Nemo?
  • Probably a million times as a kid.
  • 43. Where do you buy your jeans?
  • Either a random store or Forever 21.
  • 44. What's the last compliment you got?
  • That I look pretty. 😊
  • 45. Do you usually remember your dreams in the morning?
  • I get multiple dreams usually so I usually only remember one part/one dream.
  • 46. What flavor tea do you enjoy?
  • I like sweet ginger lemon tea.
  • 47. How many pairs of shoes do you currently own?
  • More than 10 (too lazy to count the exact number).
  • 48. What religion will you raise your children to practice?
  • If I do have children (not sure that I will), I won't teach them a very specific religion - they'll choose when they grow up. But I will probably teach them about God in general.
  • 49. How old were you when you found out that Santa wasn't real?
  • I can't remember how old I was but I remember how. I figured out after I recognized that the handwriting on the note I received from "Santa" actually belonged to my dad.
  • 50. Why do you have a Tumblr?
  • I don't use my Tumblr anymore. I find it easier to find stuff on Pinterest and Instagram or simply Googling whatever I need.

Wednesday, July 12, 2017

How to do amateur Stop Motion Animation with basic video editing software - Beginner's Guide

July 12, 2017 20

I literally did stop motion animation for the first time last month. I had never really paid attention to it let alone try it before this month. I had a slight idea originating from my common sense of how it was done.

Something told me there has to be a special software (maybe even a special camera/recommended type of camera) to use but I didn't want to spend so much on this newly found interest that I knew wouldn't last very long. Also, I assume the softwares aren't free to use (or maybe only free to use for one or two sessions) and I already have a licensed version of a video editing software so I didn't want to waste time and make my laptop vulnerable to viruses by going to random sites trying to download special software.

I had my DSLR camera that my dad bought a few months ago (since our digital camera was ages old and on the verge of dying, we thought we needed an upgrade) and a tripod, and I never looked up how people did it so I just went with what looked about right in my head. Taking a lot of pictures while moving the object or objects by a very small distance between each shot. Seems pretty easy. What I didn't know, however, was how long it takes. I had heard it was time-consuming, but I didn't think it would take as long as it did for me just to create 2-3 minute stop motion video which wasn't as smooth, but it worked.

Before you read further on, you should watch my stop motion videos to see what kind of content can be made from this short tutorial (if you can already do better than I did, this post may be a waste of your time but hey, you can check out my other articles!):


This is how I made a simple stop motion video:

All you need is any camera. It could be a DSLR, a digital camera, or even your phone camera. Just be aware of what quality of video you want to create so you can decide which camera is the best. You will also need a tripod or a make-shift tripod (holding your phone/camera in your hand isn't the best idea no matter how stable you can rest your hand, it won't work). For your first time, you can just experiment by using random objects or items lying around in your room.

Taking the pictures:
It's pretty self-explanatory. You just have to click pics, move your object a teensy-weensy bit and then click another picture. You decide where you want your objects to go so this is where your creativity should take over. There's no tutorial on that part.

My tip: 
If you are using a DSLR like I did, don't do the mistake I did the first time I shot pictures for my stop motion. Keep your shutter speed high since it won't matter for the quality of the picture. You're only moving the items when the camera isn't shooting and the camera is stationary. The reason why you should keep the shutter speed high is that otherwise, it will take way too long to take the hundreds (yes, hundreds, but depending on how long your video is it could be more or less) of pictures due to the waiting time in between.

Next, you have to transfer all those pictures into your laptop or PC.

For editing, you can use the basic software provided in your PC (e.g. if you have a windows laptop you may have windows movie maker pre-installed). If you don't, the easiest software there is is Videopad. The unlicensed version is free to use for a couple of videos (provided it's not commercial use), but then you will have to buy the licensed version if you want to make more videos.

All you have to do is add the pictures to whatever basic video editing software you use, add it to the storyboard/timeline, and change the speed of all images to around 1000%. (you can set it to a higher percentage if you want the motion to look faster). Add any text or anything of that sort if you want, and then save and export it as a video file

And that's literally all you have to do to make a simple, amateur stop motion animation film.

Check out my Behind the scenes video for a stop motion video I made recently:

Don't forget to follow my blog if you want to stay tuned for more posts and give my socials a visit! (Info on the sidebar on the right).

Saturday, July 8, 2017

How to Declutter Like a Pro in just 5 simple steps

July 08, 2017 3
how to declutter in 5 steps


Firstly, meme:
clutter vs declutter meme

Secondly, this is my guide on how to declutter like a pro. Now maybe the meme above may be a bit exaggerated (oops), decluttering isn't absolutely necessary to be happy. You can still have a complete mess of a room and get shiz done if that's your thing. However, there are scientific articles out there that say decluttering can benefit you and your emotional health. An article by Christopher Peterson, Ph.D., in Psychology Today, says that clutter can have quite the psychological effect:

              "The emotional impact of the clutter further
                                  reinforces distress."

You can find hundreds of articles on the internet about benefits of decluttering (I don't want to be making a post about that because I'll just end up saying what the other blogs say). So hence I'll share how I declutter like a pro - tricks and trips and all that jazz.

Step 1: 

Evaluate what you want to declutter. 

Your entire bedroom/dorm? Living room? Kitchen? Wardrobe only? Desk/Bookshelf only? You can choose to declutter a little part of your living/work space or the entire place - it's up to you how intense you want to get. What also helps is to find a purpose. The purpose could be as simple as not wanting clutter in general, or it could be because you are trying to shift into a minimal lifestyle, it could be if you want to reconsider and renovate your room's appearance (i.e. change in aesthetic or forming of an aesthetic style), you could want to declutter your wardrobe to make space for more clothes that you actually wear, or it could even be because you are soon moving to a new location/into a dorm/etc. and can't or don't need everything you have currently. Whatever the reason, evaluate it and it'll help you decide what areas you want to declutter. 

Step 2: 

Set goals.

How intensely do you want to declutter? Do you want the clothes in your wardrobe to be reduced to half the original number or do you want to just remove a few clothes that you haven't worn for a year? My reason for decluttering was that I'm moving into University in Fall of this year (2017) and cannot take (and also don't need) most of what I own. I have/had stuff from when I was a little child (total hoarder, I know right) so I cleared away/donated whatever was of no use to me or my younger brother. Hence, my case of decluttering was extreme. You don't need to force yourself into it unless you have a deadline (e,g. If your apartment lease is ending and you want to get rid of things before you move). You can do it at your own pace, but, don't avoid it for too long because then you'll just end up neglecting it and convincing yourself that it is okay to have all those unnecessary items.

Step 3: 

Divide and conquer. 

Divide your total intended declutter area into sections - either just by area or by category (e.g. first tees, then pants and jeans and then undergarments, and so on). Depending on your space, you can choose how much to declutter every day (or you could finish in a single day if you like). If you are anything like me, you will first make a mess from the section you are trying to declutter before it looks better and less chaotic. In this case, dividing and conquering is a good method to prevent a total mess from your entire room/area because you may not want to deal with all of that on the same day and you will just put back everything and end up ignoring it or getting bored of wanting to declutter. You want to avoid that or you will never get to your "declutter goal(s)". So do one section and then do the next section when you feel like it.

Step 4: 

Ask yourself twice if you really need the item when you decide to keep it. 

Here are some questions you should ask yourself: 
  1. Is the item reaallyy thaat sentimental? 
  2. When have I used this item last and will a situation really ever arise to use it again? 
  3. Yes I've or someone else has spent money on this item, but am I going to use it?
If you end up keeping a few items that are truly sentimental, or you are convinced you will find a situation to use it/them, but they are miscellaneous items/don't fit into anywhere, get a storage box (size depending on the size and number of miscellaneous items) and try to neatly store those items. The box shouldn't add to the clutter so maybe try keeping the box simple (one color, or a simple design that goes with the rest of the room). However, try to keep the number of storage boxes minimal, or you'll end up adding to the clutter instead of removing it.
And don't get lazy! If you do, you'll just end up keeping stuff you don't need because you are too lazy to separate it and throw it away. 

Step 5: 

Repeat. 

If you think you haven't decluttered enough, you can always come back to it when you feel like it and further declutter. Usually in my case, when I go back to the area after a few weeks or usually months, I do end up throwing away a few more items - it's kind of like getting a second opinion. Decluttering in sessions like that works best for me because each time I realize I don't need something that I kept before (because I haven't used it since the last session when I told myself I'd use it).


Tips:

+ It's easier to declutter when you are trying to revamp your room to achieve a particular aesthetic as you'll end up giving away/throwing stuff that doesn't fit with the particular aesthetic (I understand everyone's not the same so this may only work for a few people).

+ At the end, if you can organize everything without it falling out of your drawers every time you open them, you have decluttered enough (unless you want to do more then gurlll do yo thang)

+ Don't forget storage boxes/storage spaces in your room! Usually, those are the places with the things you don't need (because it's likely that you haven't even looked in the storage for a long time)

+ If you can't get motivated to declutter but know you have to, one word: Pinterest.

+ If you are going to University/moving and you are decluttering your closet but feel guilty about giving away/throwing away a lot of clothes (if you are budget-conscious like me) then I would suggest you to divide your closet into three sections: clothes that you will wear once you move only, clothes that you will only wear now and later, and clothes you want to throw/give away before moving. Wear the heck out of the clothes that you will throw away before moving and you won't feel like you wasted money. If you want, also wear the second category of clothes mentioned above frequently as it might change your mind about if you want to keep the item or not.