
DIY Polaroids! Aesthetic, Looks like the real thing + Way Cheaper!
Here's an easy and quick tutorial to make DIY Polaroid Pictures that don't require great art skills and looks exactly the same as real ones for much cheaper. My personal favorite DIY!

Okay, let me tell you straight up. This DIY has to be my most favorite one yet! It is super easy, requires very little computer knowledge (if you aren't technology savvy), only requires a document-editing software, is wayyy cheaper than buying a polaroid camera + the films every time, and looks literally the same from the front! 5 amazing pros with the only con being...nothing!
P.S. Go to the bottom of this post if you wanna skip the reading and just watch the video!
Without further ado, here's an easy and detailed tutorial to create perfect polaroid picture dupes in about only four (yes, 4!) cents each! (for a mini polaroid. for a larger polaroid, 8 cents only!). For my Indian viewers, that's around 2.5 rupees per mini polaroid (and 5 rupees for a bigger polaroid)!
Disclosure: Some of the links in this article are affiliate links, which means that I get a commission if you choose to purchase after clicking a link. This doesn’t cost you anything, and I only recommend products I love! Thank you for supporting the work I put into this site!
How to edit your photos:
To give the polaroid-like effect to the pictures, I use one of my favorite photo editing apps - VSCO.
Literally all you have to do is add the T1 filter (I like to keep it around +6 only not the entire effect, but that's up to you) and then increase the contrast. Again, it depends from picture to picture how much editing is required to give it the polaroid effect but I usually stick to +1 contrast only. The settings I use give it only a slight polaroid effect so you can adjust them according to what you want.

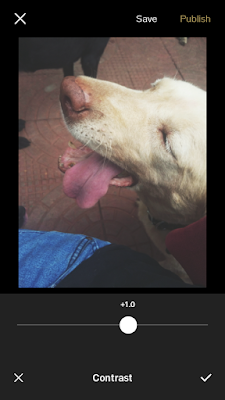
Also, the colors do look slightly different when it is printed so if you're lucky, your printer will help you achieve the polaroid effect!
Let's get to the physical stuff now:
The first thing you will need is some glossy photo paper. Preferably, use the same brand as your printer but it doesn't really matter that much. I used the HP glossy photo paper in my Epson printer and it turned out fine. The Epson glossy photo paper, I believe, is cheaper than the HP one in case you want to go for the cheaper option. I used the HP one because it was already lying around, probably from ages ago.

Next, you will obviously need a laptop and any document editing software (Microsoft Word or the apple document editing software. I clearly have no clue what it is called).
Start by first adjusting the paper size and margins. Here are the settings I kept for my specific type of photo paper:

If your photo paper has tabs and you would like to avoid those tabs, make sure to select the size option "with tab" while printing. I did not do this even though my paper had tabs. This is what I did instead: After my first print, I understood which side has an excess margin and made sure the tab came on that side when inserting the paper into the printer. By doing this, I could just break off the tab after printing and the white space in the polaroids would be uniform instead of two having longer white spaces than the other two (you will understand this better when you see how I added the pictures below).
Next, use the ruler feature to create two perpendicular lines going exactly through the middle of the page. Make the lines a light gray color so that if you cut incorrectly, the lines won't be as visible.

If the rulers are not visible, then go to the "view" tab and click on the ruler box as shown below:


TIP: To ensure uniformity, use one picture and size the other 3 pictures to the same dimensions as the first one. You can crop the picture if needed. Use one picture as a guide so that the placement is exact for the next picture and so that the white space is the same for each "polaroid".


Okay, let me tell you straight up. This DIY has to be my most favorite one yet! It is super easy, requires very little computer knowledge (if you aren't technology savvy), only requires a document-editing software, is wayyy cheaper than buying a polaroid camera + the films every time, and looks literally the same from the front! 5 amazing pros with the only con being...nothing!
P.S. Go to the bottom of this post if you wanna skip the reading and just watch the video!
Without further ado, here's an easy and detailed tutorial to create perfect polaroid picture dupes in about only four (yes, 4!) cents each! (for a mini polaroid. for a larger polaroid, 8 cents only!). For my Indian viewers, that's around 2.5 rupees per mini polaroid (and 5 rupees for a bigger polaroid)!
Disclosure: Some of the links in this article are affiliate links, which means that I get a commission if you choose to purchase after clicking a link. This doesn’t cost you anything, and I only recommend products I love! Thank you for supporting the work I put into this site!
How to edit your photos:
To give the polaroid-like effect to the pictures, I use one of my favorite photo editing apps - VSCO.
Literally all you have to do is add the T1 filter (I like to keep it around +6 only not the entire effect, but that's up to you) and then increase the contrast. Again, it depends from picture to picture how much editing is required to give it the polaroid effect but I usually stick to +1 contrast only. The settings I use give it only a slight polaroid effect so you can adjust them according to what you want.


Also, the colors do look slightly different when it is printed so if you're lucky, your printer will help you achieve the polaroid effect!
Let's get to the physical stuff now:
The first thing you will need is some glossy photo paper. Preferably, use the same brand as your printer but it doesn't really matter that much. I used the HP glossy photo paper in my Epson printer and it turned out fine. The Epson glossy photo paper, I believe, is cheaper than the HP one in case you want to go for the cheaper option. I used the HP one because it was already lying around, probably from ages ago.

Next, you will obviously need a laptop and any document editing software (Microsoft Word or the apple document editing software. I clearly have no clue what it is called).
Start by first adjusting the paper size and margins. Here are the settings I kept for my specific type of photo paper:
Next, use the ruler feature to create two perpendicular lines going exactly through the middle of the page. Make the lines a light gray color so that if you cut incorrectly, the lines won't be as visible.

If the rulers are not visible, then go to the "view" tab and click on the ruler box as shown below:
Next, add your desired pictures like shown below:

Place your paper in your printer and make sure to adjust the tab in your printer:

Here is how I set up my print options:


Print them and let them dry...


Here is what they should look like once you print them out:

Finally, try to cut them out neatly using the gray lines you added earlier as a guide.
TIP: Wait 15 minutes at least before cutting or even touching the paper. Leave it on your desk or somewhere safe. If you scratch the paper, by mistake, before it dries, you will end up moving the ink and you won't be able to fix that. Hence, wait before cutting the paper. Once the ink has dried, scratching won't hurt your picture (unless you aggressively scratch it...which why would anyone do that?).

This is the amazing final result! It turned out so pretty and looks legit. I definitely recommend only using glossy photo paper for the same effect and for longevity of your "polaroid pictures". If you use normal printer paper, perhaps consider laminating them so that they don't get ruined by smudge marks or get ripped.


This is an easy DIY with perfect results (you really can't go too wrong even if you mess up the printer settings) so I hope you enjoy trying it out!
More Ideas!
More Ideas!
- You can add magnets to the back to display on your fridge
- You can add resin to them to preserve it forever
- You can print out a large size (either use the entire 4 × 6 sheet or a bigger sheet if available) and glue it stiff foam to make a mouse pad.
If you would like to see the video version of this tutorial for a clearer understanding, click below:


