Tuesday, March 21, 2017

Laptop apps // Miscellaneous

March 21, 2017 0

There are so many apps online, and variations of the same kind of app. It can be hard to judge which app is the best. You may also not know which apps exist that could potentially change your life. Here are a list of apps that I've recently come across - some I love and some have been a disappointment and you could save your time by not installing them. I've divided them into categories to make it easier for you to know which app might just be for you!

--- Disclaimer: This post is not sponsored by any of the below mentioned application companies but gurll do I wish it was sponsored ---

College Apps

1) OneNote

There have been so many posts about this application on the internet already, but I thought it was worth mentioning. It's great especially for tech-savvy people and for people who don't want to use notebooks to take notes during classes. You can quickly type the notes during your lecture and you can create folders to segregate notes for different classes. Other features also include adding files like images (just like in any word processing application). It's advantages are easy listing/check-listing options and folder segregation/ It's mostly just liked Microsoft Word. However there is one feature that stands out, that would probably be useful especially for taking down diagrams (i.e. if you are using a tablet-computer or have a stylus as it'll take too much effort to try to draw with your touch pad), which is the draw feature:
One thing I feel it misses out on is the feature to record audio and insert it into your notes like Evernote can. Nevertheless, if you're looking for a free app that does the job, this is it.
It is pre-installed if you have Windows 10, but if you don't have it, you can download it here: https://www.onenote.com/download
I rate this app a 8/10

2) Grammarly

You've probably seen Grammarly's ads around the internet, but it is quite cool. It corrects your grammar so 1) you don't make a fool out of yourself while writing important essays or emails and 2) so you can possible get a good grade in English. The only catch is that the free version contains only basic grammar correcting features so if you want the whole deal you have to pay. In fact the free version gets pretty annoying if you make "advanced" grammatical errors as the app will only tell you you've made them but you have to pay to know where they are in your write-up and how to correct them. But other than that its pretty cool because you can use it online anywhere you need it and you can even add it to other softwares like Microsoft Word.
I rate the free version of this app a 7/10 and the full version could possible be a 9 or 10 out of 10 (but I haven't used it yet)

General Study Apps

1) Super Simple Highlighter (Google Chrome extension)

This is a great app and I love it. It basically lets you highlight anything on any web page you want to. You simply just have to select the text, right-click and select what colour you want that text to be highlighted in.
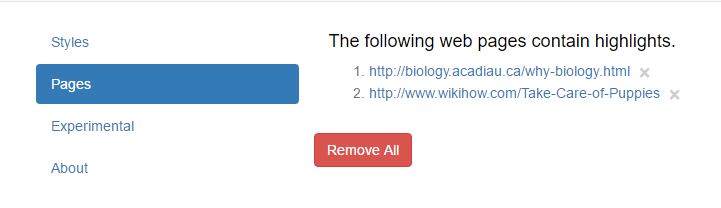
The highlights get saved so every time you go on that web page, the text you highlighted previously will still be highlighted. You can see what pages have highlights in the options setting for the extension
If you've highlighted a lot of text on one long webpage, by left-clicking on the extension icon, you can see all texts that have been highlighted with their respective colors and you can search sentences/keywords/etc.
This extension is amazing if you are making summary notes off of one or more websites.
I've also used it a lot of times when I have to send a long reply to important e-mails and don't want to miss out on the important points I want to revert on. I just highlight the points that concern me/I want to address in the email I have received and use it to make sure my e-mail contains all the points I want to include. This app has been a life savior and there are so many uses for this app. The only one flaw I could take out from this app is it's appearance (it doesn't look modern) but that's just a small personal opinion that is irrelevant to its function
I rate this app a 9.5/10

2) Forest: Stay Focused

If you like little cute rewards for being productive/focused this is the app for you. In the app you get to plant a seed and then all you have to do is not stop studying till the timer ends. If you manage to do that, your seedling grows into a tree and stays alive in a forest (all your trees get added to your forest). It's a nice little way to keep you productive and determined to study till the timer ends. However, I like the phone app better than the pc app for some reason. Probably because you get more stats in the phone app and a lot of stats just hits me in the right place (can anyone relate haha). The app lets you black list websites. Now the first time I used the app on my phone, I couldn't go off the app even if I needed another app while studying (like say some important image with notes on it in the gallery) but I'm pretty sure you can now whitelist apps on the mobile app.
This is a simple but effective app...unless you have no will power at all and you keep killing your trees, then it's just straight up frustrating. 
I still feel there isn't much to this app and isn't as functional as the rest on this list unless it reallyyy works for you (which doesnt do much for me, it does okayish)
I rate this app a 7/10

Other shizz

1) Instapaper (Google Chrome extension)

Okay, so I saw this on the main page of the Chrome Webstore and I don't know where this app (/extension) has been all my life. It says you can save your links offline to read later. Now I know I'm probably the only one who was impressed by it but it made sense. Especially if you take your laptop to college every day and don't have access to wi-fi (and say you don't have internet data on your phone or your data is up). It could also useful if you're travelling and need to read stuff online on the way. Once you have this app on your laptop all you have to worry about is your laptop battery. At least that's what I thought. After downloading the extension, I realized you do need an internet connection to open the saved links...so basically its just a bookmark which makes no sense at all. However, it does have a phone sync option which I will check out later and maybe this can make it on to the "good apps" list on the phone apps post I will be posting later. The only useful feature I see now in the laptop app is the speed read feature, so you can use this app to increase your speed of reading. The visual interface is nice, the website has a minimalist modern design. The app has a highlighting feature but it's something like 5 highlights free per month. This was kind of a disappointment for me but hopefully the laptop-phone syncing option will make it more useful (?)
 I rate this app a 3/10 
(You could pair this app with the highlighter app mentioned above to give it more functionality and use it like a bookmark app to easily find your highlighted pages, but on it's own my rating above says my opinion).

2) myTaste Browser Button (Google Chrome extension)

This is a good extension for those of us who see all those mouth-watering recipes online, save them in a random bookmarks folder without noticing which folder it was, losing that recipe link, and forgetting that recipe for the rest of our lives. You can say this app is like a specialized bookmark app for recipes. There's nothing else to it but I think it's pretty useful to keep your recipes in a single place and have folders segregating the type of recipes (e.g. deserts, lunch, healthy, etc) without having a million bookmark folders in our browser and losing track of all of them amongst the other folders. However, you could just save your recipes on Pinterest too. So this again is kind of an okay-okay app
I rate this app a 6/10

3) Instant translate (Google Chrome extension)

This app is basically an easier version of having to open a new tab, typing translate.google.com, selecting language and then translating whatever you have to translate.
you can instantly (like the name suggests) translate anything. This is great for you if you are learning a new language too, especially if you are too lazy to open google translate again and again.
Nothing much else to it but personally, since I've been learning Spanish, it's been a useful app to have around when I'm curious what a particular word or sentence is in Spanish
I rate this app a 7/10


Tuesday, March 7, 2017

DIY Ripped Jeans // DIY

March 07, 2017 0


The method of making ripped jeans is quite simple, as there are only a few steps and you can't really go wrong - it's kind of like an abstract painting - just make a few slits where ever you want them to be and start distressing. However, there are some things you should keep in mind. Continue reading to know how to make ripped jeans easily...

×  ×  ×  ×  ×  ×  ×  ×  ×  ×  ×  ×  ×  ×  ×  ×  ×  ×  ×  ×  ×  ×  ×  ×  ×  ×  ×  ×  ×  ×  × 

1) Marking your jeans
The first very important step is to mark where you want your holes/slits/distressing. 

 Note: It is very important to put on your jeans so you don't end up cutting holes too high/at the wrong places. If you're using a permanent marker, place the lines/marks a bit lower than where you'll actual cut your jeans so you can get rid of the markings and don't have to cut higher in order to do so.

2) Cutting
For the next step, first, take off your jeans and choose a place to dedicate to the future mess. Cut slits if you want to distress the denim and holes if you (wait for the obvious....) want holes. You can use an X-acto knife or any other sharp-bladed object (but be careful and make sure to insert a cardboard or any kind of thick sheet in between if you are using a x-acto knife/cutter!)

Create whatever sized hole you desire but stay at least a little bit away from the border/seam/whatever you call it

Note: You can use an uneven surface like your bed, it doesn't really matter because you will usually find it comfortable to hold the part of the fabric you are cutting/distressing. I personally recommend you sit on the floor as while you remove the fabric threads, the threads will end up everywhere and trust me when I say this, there will be a lot of threads. Everywhere.


3) Detailing holes
Making the holes look messier is quite easy. Once you've cut them out, just take a pair of tweezers and slide it across the edge while applying pressure - this will loosen up the threads at the edge (see bottom picture). You can further pull on either the white (horizontal) strings or the blue (vertical) strings according to how you want your hole to look. Tug on both or just tug on whatever comes in your way if you just don't care...but don't tug on the other side of your jeans!


Note: I've read some blog posts that say rubbing pumice or other hard materials (can't remember the other "hard materials" because I didn't really pay attention) on the edge of the cut helps to loosen up the threads, however, that didn't really do much for me. I think just using a tweezer to tease the edges works just fine and you don't have to look for a pumice stone or whatever.


4) Distressing
Distressing is quite simple too, once you get the hang of it. All you have to do is cut two horizontal (and parallel) slits as long as you want. Then just pull the blue (vertical) strings carefully and the white strings will start to reveal and stay put. You have to be kind of careful with this if you're using sharp tweezers (which you will need if you don't want to take forever) or else you will end up pulling on and breaking the white strings.


Note: You can break the white strings in between or randomly after you pull all the blue strings out, that is up to you. You can even make an extra slit under or above an already cut out hole and distress there to make your hole look distressed.
Note: You can practice distressing on the big fabric scrap piece that you have as a result of cutting out a hole (great especially if you cut out a big knee hole or something like that) and you can find out what size of distressing you would like (you get the idea).

×  ×  ×  ×  ×  ×  ×  ×  ×  ×  ×  ×  ×  ×  ×  ×  ×  ×  ×  ×  ×  ×  ×  ×  ×  ×  ×  ×  ×  ×  ×

I really like how my jeans turned out. This is great if you love ripped jeans and love being asked if you can't afford normal jeans because now you can say "Yes I can't and I can't afford ripped jeans either, that's why I DIY'd them" and then continue to get weird looks :D (jk, but not really though).


This is really easy but I'd say it is kind of time-consuming (or maybe my jeans were just really stubborn because it took me forever to get the threads loose at first). The DIY is still great and also it's also great if you have old jeans that you want to re-vamp or have a stain on your jeans that you can't get out but only wore the jeans twice and you want to still wear them (like I did from dropping acrylic paint on mine). Kay, Bye!
How the jeans finally turned out! :D

Wednesday, February 22, 2017

APPLYING TO UNIVERSITIES + ORGANIZATION TIPS AND TRICKS // College Talk

February 22, 2017 2
Note: This post is for those applying to universities in the USA, however, the first few paragraphs can apply to anyone applying anywhere as they are generic tricks I have used to organize my lists.
===================================================================
I have begun applying to several Universities and I have found different tricks and tips to keep the process organized and make sure you don't miss the deadlines.
(Even if you have a counselor these methods can be useful for you)
You should start the process before/around the time applications open for your desired semester (e.g start in August if you are applying for the fall semester for the next year) if you want to be considered for scholarships (there is a better chance of getting scholarships when you apply before the 'Early Decision' deadline)
So the first, very obvious step is to shortlist your universities. The easiest way to do so is to first write down your requirements/factors in order of priority. Let's say you know what you want to major in, then your first priority will be whether the university offers your major, and then you can work out the rest of the factors. Here is an example list:
1. Major/Degree
2. Tuition/Total cost of attendance
3. State/Cost of living
4. Online rating/ranking of University
5. Percentage Acceptance

I followed the same process as above and then further reduced my list to get around 10 universities. If you are okay with applying to 10, then you can skip this paragraph, otherwise, continue reading. After I shortlisted 10 universities, I further shortlisted them based on tuition (as this was my main priority after 'Major'). My tip is to use a spreadsheet software like Microsoft Excel to type down all your universities in rows and the different categories in columns. Putting all relevant information in an excel sheet (i.e. in one place) can help you further decide which universities you are more inclined towards. 
This is what your shortlisted "University" Column would look like:
The next step (optional: i.e only if you want to make it before the Early Decision deadline) is to add an extra column (preferably just next to the University column) with the application deadlines.

Ignore the numbers in the brackets, I've done that to calculate how many credits I'd have to do per semester to finish my selected course in 3 years
As you finish applications and send the required documents by mail to the universities, you can update your sheet like I have done so above. I used a light gray cell fill to indicate applications submitted and dark gray cell fill to indicate that I have sent my documents (Key shows the same below - Add a key below your main table so you don't forget what different colors mean!)


The deadline column will ensure all your cells are filled with dark gray fill (or whatever color you choose) before you miss the deadline. 
You can also set reminders a few days before the deadline on your phone or your computer to make sure you submit your application on time.

I also recommend creating organized folders on your PC to segregate documents for each university and make sure you have all documents necessary in each folder.

e.g. of inside a university folder (CL = covering letter)

How I've organized my universities folder

--------------------------------------------------------------------------------------------------
Just in case you don't know, the documents that you will be required to send to the universities will be:
1. High school transcripts
2. Marksheets
3. Certificates (if you have already graduated)
4. Resume
5. Statement of Purpose Essay (a.k.a Personal Statement Essay)
6. Recommendation Letters from 3 of your teachers
You may also have to send a copy of your passport
If you are a non-citizen, you will have to send some documents showing that your parents have enough funds (Financial support document, affidavit, etc) but your counselor will be the best to assist you with all of the above-mentioned documents (your counselor will also help make covering letters and labels so your documents can be couriered in the correct way).
You will also have to send your ACT/SAT scores to each university you apply to
--------------------------------------------------------------------------------------------------

Once you have finished all of the above, you can do one last thing while you wait for your letters.
Rank your universities so that if you get accepted in more than one university, you know which one you prefer over the other.
This is what my excel sheet looked like after rating and the corresponding key:

(column D in the above excel sheet image is the scholarship I have/will receive(d) from the universities. As of now, I've received an unofficial acceptance from Truman State University.


So that's about all I've done so far to keep my universities organized and make sure my applications have been submitted on time. 
If you have any questions be sure to leave them in the comments below!


Friday, February 10, 2017

Night Photography // Photography Album

February 10, 2017 0
[Miniature series]
I enjoy both pitch-darkness but also minimized contrast/extreme fadedness, I like sharpness/clarity but also blurriness. So I put together a mini night time photography session I did including all the elements I mentioned above. 
(To be honest, I was just bored so I took out my DSLR and took some random pictures at night from my window. Here are some random images - not even photography exactly)

⚫️


Friday, January 27, 2017

Bullet Journal - 2017 // Planning

January 27, 2017 0

So this is my first attempt at Bullet Journalling and I can't believe I didn't come across this last year or the year before that. It was only last month when I came across it on Pinterest and decided to see what it was all about. The Pin led me to the blog "Sarah's Chapter" (http://www.sarahschapter.co.uk/2016/02/starting-bullet-journal.html) and the blog post inspired me to make my own bullet journal for 2017.

I started preparing my journal in late December (2016) because I knew I wouldn't get time in January as I had my finals. So technically I haven't even spent a month on this journal but I have been really enjoying it so far. One of the reasons I enjoy it (which I've heard many people who have bullet journals say) is because it is so flexible. You can literally decide what you want on each page (unlike in a planner). You can buy a journal and a few pens and you're good to go. I think of a bullet journal as a planner with more fun (and more organisation potential).

I love organizing everything and anything so I feel like a Bullet Journal is all I need. I was majorly inspired by Sarah's chapter and then I continued to hunt for more Bullet Journal posts on Pinterest for inspiration and ideas.
Here's what I have done in my journal so far (I'll probably post an update half way or near the end of the year)

My Bullet Journal // 2017

Firstly, I'd like to address that I didn't get any fancy or even known brand of journal. I just used a new random lined & hard-covered book that I already had at home.

On the first page (which I haven't exactly shown below) is a little blue sticky note with a key on it for my weekly and daily planning pages. I am about to graduate from high school and I have finished applying to Universities in the USA (post related to that will be up soon) and so I decided to keep the second page blank for my future class schedule. I thought it would be more convenient to have it on the first pages rather than dedicate a page to it in August (or whenever I get my schedule) even though I have an Index page. Keeping other bloggers' advice in mind I kept more than one page for my index. I kept two. I don't know if it will be sufficient but I'm planning to have two or three columns on both the pages and just roll with it. 
The first two pages of my bullet journal. You can even add page numbers to your journal and write the corresponding page numbers to each topic in your index

Here is where I overestimated my handwriting skills and thought I could freehand the whole annual calendar without any vertical guide lines or anything like that. The orientation wasn't exactly neat and I did this page really late at night when my brain was preparing to shut down hence I made quite a few errors and the page doesn't look blog worthy according to me. However to give u an idea, I didn't really customize this page. I really just almost did the same style that was done on Sarah's Chapter (again, you can click the link above - her journal is way more neater and better looking than mine. *heart eyes* )
Yeah, just skip to the next part.

Okay so I know how what you're thinking (once you've seen the picture below). It's not how it looks.
As I said above I didn't really get time to focus on "2017 - new year" because I had finals. But I 100% honest to god plan to fill this page in before the end of this month (or probably today? maybe? I don't know). Also on this page is my "TBR" (stands for "To Be Read" if you didn't know) section which I also plan to update but I have two books on it so far. I also stuck some washi tape to make it look prettier (not that any book isn't pretty - every shape and size of book is pretty okay).
No important caption here either, move along.

Next is probably my most functional page on the right and a savings tracker on the left. You can choose what elements you want to put on your planner, whatever suits you!

Here's a close up of the budgeting page (the date part is quite unnecessary). The positive sign basically means deposits (like income earned, etc) and the negative sign is withdrawals.

Future logs can be quite important in your bullet journal. I have filled in birthdays of people close to me (because I'm really bad at remembering birthdays) and will add other categories too
The future log can help you if you have some planned events for the next month or way later. You can just write it down in the future log so you remember to include it while making your weekly or daily logs.
Apparently I'm really bad at captions (also bad at captions on my instagram if you want to check it out @blackandwiseandwhite *wink wink*)

I have left a page blank to print out some stuff on sticker paper and stick it on it to create a sort of Inspiration board or Vision board - I don't know what direction I want to take that in yet. Then I've dedicated two pages (front and back - back not shown) to the "TV Series" tracker. As you can probably tell I watch a lot of TV shows. A lot. And I've added 2 more to the list since taking this picture (it's a problem, I know).
Comment below if you watch any of the shows listed above (i.e. if the text is visible)

I have one page for my grade tracker so I can just...keep track of my grades? Pretty self-understandable.
Bad at captions, remember?

Finally here comes the more date orientated part. I have an Activity tracker (only for Feb and March as of now. I skipped January as I was only studying the entire day every day #hustling ...yes I know hashtags don't work on blogger I'm not stupid). That is followed by the weekly log for the 4th week of January and I'll be deciding which week to include in February as I don't have much planned yet so I don't know which week will be busy enough to deserve a section of the page (dramatic, much?).
That moment when you have to put so many efforts into making the page look presentable (because you have sloppy handwriting) that you forget February only has 28 days.

So that's mostly it for now. I also have the last pages of the journal with the headings "Recipes" and "Quotes" as one of my goals this year is to learn to cook a bit and I love having some of the most relatable/ most impactful (personally) quotes written down to read whenever I need some inspiration or even just casually.

Hope you enjoyed this super long post (if you had the attention span to read it haha) and let me know if you've had any experience with maintaining a bullet journal and if you have any tips for beginners like me.

Saturday, December 31, 2016

2016 - Life, Events, & People

December 31, 2016 0

Saying 2016 has been dramatic and chaotic is definitely an understatement. 

Personally, 2016 has been a year of change for me. I have grown and changed and come to terms with so many aspects of my life. This year I have felt a change like I have never felt before. I was under a dark cloud since the end of 2015 and that cloud also rolled in 2016 as well. However, I defeated that dark cloud this year to find myself (I know how cliche that sounds, and I know people just throw that phrase around, but it's true). Bright days do actually come after the rainy ones. Of course, I don't take "rainy" "dark" etc. as metaphors for sadness but putting that aside, I really believe that I've never been this happy with my life. I truly feel rejuvenated after the phase I've been through. I have learned to not be affected by things I cannot control and I have learned how to be happier than before. I feel aligned with my soul. I have learned more about myself this year. I have learned what kind of thoughts make me happy, what kind of activities make me happy and what kind of people make me happy.
The person who stood out most to me as someone who makes me really happy is my younger cousin sister. Something made me realize this year that I am so lucky that I have her as my sister. I believe, one-hundred percent, that she is a crystal child. She has healing powers. I can feel it. No one I've ever met has made me feel that they have the ability to make anyone feel good at any given moment. I know she has come on this planet for a reason - to spread love, to spread happiness, and to spread just the best vibes. I am so lucky I got to be with her this year, even though it was only for a week and a half. I love you and I hope that the people around you, physically, know how lucky they are.
There are two other people who have been a great part of my life. You probably know who you are because both of you are my soulmates in a way. The first one is obvious. The other, if you are reading this and you are doubtful about whether it is you or not. We don't interact frequently, but I think it's safe to say that we connect on a different level. Having the conversation with you about how I wish I could find another soulmate made me realize it would be so much better if I could actually meet you often and I wish I wasn't going to fly so many miles away from you next year because I think you would meet what we say are our "expectations".
Wow, I just opened up so much above. It's scary to open up. To be honest I don't always like it.
This year I have also realized that I have opened up to the wrong people. In the spur of the moment, I thought it felt so good just to know the next day that maybe the conversation really didn't mean as much to the other person as it did to me.
Despite me losing places in my heart for some people this year, I think what matters is relationships I have maintained and the way I've grown.
More widely speaking, I bet the majority on this planet right now believe that 2016 has been a very very rough year. Terrorist attacks, government events, natural disasters, Harambe - the list goes on and on for 2016. There's no argument that this year has had more unsuspected raisins in the cookie than any other recent years and nobody likes a raisin surprise in their cookie.
What we all can do now is just spread peace and love and happiness the best we can and hope the universe will take care of us.
Honestly, I have no expectations from 2017. All I know is that, personally, I want things to go according to what I have planned for my life. Whether or not events occur as they are wanted to happen, personally or around the world, is up to the universe or whatever higher power you believe in (if you believe in one). I know that I am the Universe's child and that I will be taken care of. The universe always has a plan for everyone and all you can do to make the most out of any situation is to learn and grow from it. Everything will be okay. Spread happiness, it's important.

Thursday, November 3, 2016

Diwali 2016 // Photography Album

November 03, 2016 2

Diwali is the festival of lights. Here are a few snaps I took this Diwali (2016). Please leave your comments/suggestions below as I'm a beginner at photography and would appreciate any inputs. Thank You!


Saturday, October 29, 2016

Ctrl + Z

October 29, 2016 0
Sometimes shit happens.
Ugly. Unnecessary. 

The Happening: In the heat of the moment, nothing seems terribly wrong. You convince yourself that what is happening is supposed to happen. Sometimes you aren't even thinking. You convince yourself that it is the end, so you don't try to make amends, you don't try to put a filter on what you say, you don't think before you speak/take action. You are convinced that it is a chapter of your life ending.

Nothingness: Then there is a period where there is a cast on your mind, blocking it from emotions and reasonable thinking - a continuation of your delusion that what you did was completely right. If you are like me, at times you block out every thought and emotion, every voice in your head and when it all gets too much there's a wave of all those emotions you kept putting into the "spam" folder.

Confrontation and Further Delusion: Depending on the situation, after a particular amount of time, you finally give in. You may want to take the blame or may want to finally get in touch with your emotions and the person/people involved and have a conversation. Maybe both those options fluctuate in your mind. You may regret what you said or what happened, you may want to open up to someone, you may even have fake conversations with that person in your head - hear it in your head the way you would want things to go. You may desperately want to make amend because you realize you miss the person. All these options may fluctuate in your mind, confusing you. The fake conversations you have raise your expectations and hopes of the outcome but you want what you want so bad that you believe the potential lies your brains tells you

The Dilemma: You sort it out but something feels different...
Sometimes you want something so bad but after you finally get it, you don't want it anymore. It's the weirdest human behavior. Time and effort fades your desire into nothing. You start to question yourself 'Why didn't the conversation go like it went in my mind?' 'Why do I feel so neutral now?' ' Does that mean that I never truly wanted it?'. You know somewhere inside that you want it, but the series of events that took place exhausted you and exhausted the enthusiasm in you for that thing/person/relationship. Somewhere in your head, you know it was the incident that caused this change in feelings, or at least you make yourself believe that even if it may or may not be true.

Ctrl + Z: The situation ruined it for you. The emotions are different, even though you don't want them to be. They aren't bad, just different; not with the same intensity. You wish things hadn't happened the way they did because change isn't your favorite thing. Change isn't comfortable. You wish you could undo what happened - undo everything you said and did...but life isn't a computer. You can't pretend something never happened by just clicking Ctrl + Z.