Saturday, September 30, 2017

People - A Photography Album

September 30, 2017 0
Just a random compilation of a few photos I took of human beings. I never really took pictures of other people because my comfort zone is "non-living" or "non-motile" (aka Nature, usually). So this is kind of like a trial, I guess. I hope to have some proper photoshoots in the future! 

©BlackandWhiteandWise
Literally taken in my bedroom. Spur of the moment decision when I realized the lighting in my room became kind of dramatic (monsoon season yas)

©BlackandWhiteandWise
Took this picture at my dad's office's opening ceremony. Everyone was dressed up in Indian Attire. The chief guest cut the ribbon and was given a bouquet of flowers as a gift.


©BlackandWhiteandWise
Taken of my brother as he waited to be hit by the tides of Miami Beach last year.

©BlackandWhiteandWise
Self Portrait by that same window because dramatic af

©BlackandWhiteandWise
This candid picture was taken of my friend on New Years Eve 2016. We (friends) were dressed up to do a photoshoot and I clicked this actual candid (it wasn't faked, I swear). Quality is not as good as the other pictures due to some unknown reasons and maybe because the artificial lighting was not good enough to trick the camera into thinking it was daytime.


Wednesday, September 27, 2017

Petroleum Jelly v/s Eyelids (What it Did to my Eyes & Why you shouldn't use it)

September 27, 2017 17

Like a lot of people, I spend a lot of time on Pinterest and the Internet in general. I read on a couple of occasions that people were using Petroleum Jelly on their eyelids to make their eyelashes grow and I was intrigued.
The particular reason for it catching my eye (geddit? geddit?..I'm sorry please don't leave) was the fact that I have short, sparse eyelashes and I've disliked that for a very long time now. My eyebrows are sparse as well. Despite having this first world "problem", I never really did anything or never took care of my eyes to maybe help them be moisturized or whatever. I just let them be and once in a while would hope that I would wake up with my eyelashes a little longer.

When I saw that people were using petroleum jelly, I thought, why not. Petroleum jelly is branded as a cure-all or help-all so I thought there would be no harm.
I started applying it to my eyelash line every day hoping the moisture it provided would help my eyelashes grow somehow (as if they were plants).
For a little backstory, let me tell you other factors that played into the soon-addressed disaster.
I was traveling every day to school by bus. Public bus. In India. If you know anything about the city life in India, you know that it is very polluted and traveling by a public non-AC bus (I also traveled by AC buses but the non-AC buses were more frequent so I'd ride them so I could reach school earlier) with all the windows open, doesn't really offer any protection from the pollution and dust that's flying around.
I did wash my face when I came back home but that didn't really help...let me tell you what exactly happened.


Disclosure: Some of the links in this article are affiliate links, which means that I get a commission if you choose to purchase after clicking a link. This doesn’t cost you anything, and I only recommend products I love! Thank you for supporting the work I put into this site!

Apparently, I should've done my research before I decided to use petroleum jelly on my eyes.
It was the summer time in India, and summers in India are very intense. Sometimes even ceiling fans don't do the job because it is just so hot. One day, I started itching my eyes a little. It didn't hurt, and it just felt like my skin was dry. I didn't think much about it. The sensation became stronger towards night time and I didn't know what to do. I didn't have any eye drops on me so I just washed my eyes with water a couple of times and went to sleep. I woke up with my right eye swollen and red. It looked like there was some fluid buildup and I kind of freaked out. Initially, I thought it was due to the dust and heat or something because I traveled to school daily in unbearable heat. The only thing that didn't add up was, why now? It had been over a year since I had been traveling the same way to school and back and this had never happened in the past. I still washed my face every day like I used to. So what was different now?
I got a small bottle of some generic eye drops from the pharmacy. Though very slowly, the swelling or whatever it was, did go away. I went back to applying the petroleum jelly and it was all normal for a few weeks. 
My eye started itching again but I ignored it because it wasn't possible to have another eye infection in the same month was it? I was more careful this time and I made sure to wash my face immediately after I got back. But I was wrong. The same thing happened all over again. I applied the eye drops once a day again and it slowly subsided so I didn't visit an Optometrist.
By the third time, I knew the moment my eyelids started feeling itchy, what was about to happen. I put in eye drops even before I noticed any bulge or redness but that didn't stop my eye from getting infected. Also, note that it wasn't just only my right eye. My left eye got infected to the second or third time (but it was always only one eye, thankfully). This time it was a bit worse than the last two times and I that's when I finally went to the Optometrist. 
The Optometrist told me that it was a dust infection and prescribed some medications which helped my eye in just a few days.
But it still didn't make sense to me. How did I get the eye infection 3 times in one month? It had never happened before.
I realized that the petroleum jelly was the only variable and I decided to do some research.
Apparently, even though claimed to be "non-comedogenic", petroleum jelly does trap dust particles in. So I was moisturizing my eyes, but I was also trapping any dust particles that were on my waterline. Petroleum jelly (if you are good at chemistry, you will know), is not soluble in water. Hence washing my eyes with water was not helping and the dust particles remained trapped. I also came to know later that petroleum jelly doesn't really help grow your eyelashes. Moisturizing them doesn't necessarily mean they will grow longer. Basically, I did all of this for nothing and it harmed my eyes (thankfully though it was only temporary). Once I stopped using petroleum jelly, I never experienced another eye infection despite being exposed to the same traffic and pollution and heat.

Also, another property of petroleum jelly that makes it not-so-safe for your eyes is that it is viscous. It is completely safe to use oils but petroleum jelly is thicker and has more density so it can weigh down on your lashes.

I didn't take any pictures of the eye infection just because I hated the way my eyes looked (obviously) but I'm pretty sure you can visualize what an upper eyelid looks like when it's swollen and red.

A lot of people use it and have experienced no inconvenience, but I personally suggest you do the following as a precaution if you are using, and want to continue to use, petroleum jelly on your eyelids (maybe because you want a cheaper alternative to eye creams or something along those lines):

  • Buy a baby shampoo like the Johnson's Baby Shampoo (doesn't have harmful chemicals such as sulfates, parabens, and dyes, and doesn't burn your eyes)
  • Take a drop or two of the baby shampoo and dilute it with water. Wash your eyes very close to the eyelashes (so as to wash your waterline and upper waterline) and then just rinse your face to remove any leftover shampoo
This will help you remove any dust particles thoroughly and I do this occasionally or frequently depending on how frequently I go out and it's an effective way to prevent any dust related eye infections.

If you are using petroleum jelly for any reason on your face/body/etc, make sure to use one from a known brand. Don't risk buying from an unknown brand you have never heard from. This is why:
Petroleum jelly is refined from oil and the components that are removed from it to make petroleum jelly are thought to be carcinogenic (in some cases). Before you freak out, know that companies like Vaseline are tripled refined and are non-carcinogenic. Hence only buy from brands of which the degree of purity is known to avoid unnecessary harm.

It is also advised that if you have acne or any similar skin condition, you shouldn't use petroleum jelly as a moisturizer for your face (instead you should use a water-based gel moisturizer).

Even though I believe you shouldn't use petroleum jelly on your face, there's no harm using it on the rest of your body and I still use it on my body as a moisturizer sometimes. You can use it to moisturize your knees or elbows (since they tend to become dry and rough easily, at least in my case). 
There are a lot of other uses of petroleum jelly where it actually benefits you rather than harming your body, for example:

  • to heal minor scratches/burns
  • on your hair (I've tried this!)
  • when you are doing nail art (to protect the surrounding skin of your fingers)
  • on your pets' paws
  • you can even put a little bit on before spraying your perfume on that spot to preserve the fragrance for a longer time
Petroleum jelly isn't a dangerous product, but you should just know where to use it!


Sunday, September 24, 2017

Faces Cosmetics Review - Is it a good drugstore brand? (Hypoallergenic and no animal testing!)

September 24, 2017 9
Faces cosmetics review

Faces Cosmetics is a Canadian Makeup Brand which (as far as I know) sells mainly in Canada, Mexico, Quebec, India and I think even Honduras.

Faces is pretty famous in India too, maybe not as much as Revlon, Loreal, and Maybelline, but you still see the Faces stall with the others in the mall and there are quite a lot of proper stores in malls too. Faces is a bit more affordable than Revlon (there might be products that are an exception) for the most part and the brand has a decent price range.

Though I don't own all Faces products that are available in India, I do own a lot. I'm only going to review products that I believe are worth the bucks. (But as a heads up, some products that I'm not a fan of are their loose powder eyeshadow pigments and their nail polishes).

One thing that I love about the brand is that the products are hypoallergenic! If you don't know what that means, it basically means that if you have oily/acne-prone/combination skin type, the face products are great for you and won't cause you to break out! The brand also doesn't test on animals, which is great if you are vegan or simply love animals (like me) and don't want to buy products from brands that test on animals.

1. Ultimate Pro Illuminating Powder (a.k.a Highlighter)

Faces cosmetics highlighter

This one is definitely on the top of my list. It might even be my favorite makeup product I own right now (partially because I'm in love with highlighters in general). In fact, I will go as far as saying that I like this more than the MAC Mineralize Skinfinish highlighter. Yes, there is the powder flying off if you use a big brush but it isn't a big deal. If you apply it using ur finger (even a light dab on the powder and on to your face is more than enough to make your cheeks pop!) or a small fluffy brush you'll get less powder flying. And it lasts all day long!

Faces cosmetics highlighter swatch


2.  Makeup brushes

Faces cosmetics makeup brush

It may be my lack of experience in the "makeup brush" sector of makeup, but Faces brushes are pretty good. My favorite one is the small fluffy brush for applying eyeshadow (not shown in the picture above because I couldn't find it in time) and the blush brush (which I use for everything but blush. #TeamNoBrushKnowledge). The quality is pretty good and there's no hair fall out.


3. Matte Lip crayons and Lip Pencils

Faces cosmetics lipsticks
I hate when lipsticks say they are "matte" but have a very visible/noticeable gloss to them. ???. This is one is completely matte and the texture is creamy so you don't feel like you are dragging your lips every time you put it on. There's great pigmentation and it lasts for a decent amount of time. If you eat a lot there will be transfer and you may have to reapply, but otherwise, it should last the whole day! The formula could be a bit drying but if you make sure to moisturize your lips a few minutes/sometime before applying your makeup then you should be fine. (If you have unmanageable dry lips then maybe matte lipsticks just aren't for you in general). The lip pencils are also smooth and easy to apply. They are the right amount of soft if that makes any sense; not too hard but not so soft that it breaks every time you try to line/contour/fill in your lips.

Faces cosmetics swatches

4. Eyebrow pencil 

Faces cosmetics eyebrow pencil
I have sparse eyebrows, and when I say that, I mean S P A R S E. Many would even say non-existent (I like to believe they're a bit more visible now than they used to be a few years ago - I'm getting there). So filling in my eyebrows is something I like to do frequently. Most eyebrow pencils out there are either way too dark or way too brown (I have black hair) so I'd always just use black eyeshadow to fill in my brows. I've heard beauty gurus say all the time to use dark brown if you have black hair and I didn't realize how much of a difference that made (even though it may not seem so) until I used this product. It's a great waxy formula and the spoolie that it comes with on the other end is a plus point. One problem is that it will spread if you rub your eyebrows (e.g. if you're itchy or whatever, I don't know what you deal with, eh) so it isn't smudge-proof but for the most part, it does the job well. It's really easy to blend out if you put on too much so there's a lot of control as far as the intensity goes, but again I just wish it would become a bit smudge proof after a few minutes of application.


5. Gel Eyeliner

Faces gel eyeliner
The eyeliner isn't that special (nothing really stands out when compared to other brands) but it does the job and it doesn't break the bank just like the other products from the brand (note that the foundations can be a little higher priced compared to Maybelline's, etc). I do love the fact that the brush comes with the liner and is in the cap (I just realized it would've helped to take a picture of that but basically half of the long extension of the cap snaps off to magically reveal a tiny, cute brush) which makes it more hygienic in a way since the brush isn't lying around in a dirty pouch. It has a very dark, opaque pigment which I like but it does smudge a little (or that just could be because I scratch my eyes every few minutes when I forget I have eyeliner on). It's a good eyeliner if you're not looking for anything super special. I recommend it if you prefer gel eyeliners over felt-tip/liquid eyeliners. I personally prefer gel because the brush gives a more precise and sharp wing.


Is it the best brand? No. Does it fall under my Top 10 favorite drugstore brands? Yes. Overall, I love the brand and will probably try out a few more of their products soon. Out of the above list, I would definitely say that my favorites are the highlighter and the eyebrow pencil.

Thursday, September 21, 2017

6 Important Things I Wish I Knew Before Starting a Bullet Journal

September 21, 2017 1
I only started my Bullet Journal a few months ago so I still have a lot to learn and practice. However, I have made so many mistakes and realized a lot of things that I wish I knew before starting a Bullet Journal. Here's a list of 6 important things I wish I knew before I started mine:

things you should know before you start your bullet journal

Disclosure: Some of the links in this article are affiliate links, which means that I get a commission if you choose to purchase after clicking a link. This doesn’t cost you anything, and I only recommend products I love! Thank you for supporting the work I put into this site!

⬩⬩⚫⬩⬩

1 ➤ You make mistakes! 

There will be scribbles and cancellations and strike-throughs. You may add an extra day to a month while making your yearly overview or make a spelling mistake because you are so focused on trying to make your lettering look perfect. Sh!t will happen and there's nothing you can do other than practicing. I was annoyed every time I made a mistake because I saw all these pretty, flawless bullet journals online and I couldn't make it that pretty. Give yourself time and you will get better at it!

2 ➤ Aesthetic!

You should watch a lot of Bullet Journal videos on YouTube, so you can perhaps figure out what aesthetic you like the best. I didn't do this and I didn't even realize I wanted my Bullet Journal to look like a certain way so I winged it and sometimes winging it doesn't work the the best. My Bullet Journal was all over the place and I didn't feel like using it. I re-made my journal to an aesthetic that I liked best after doing some research on YouTube and getting inspiration from videos that were similar to my aesthetic. You can even search on Instagram if you are aiming for some beautiful layouts!

3 ➤ It can get overwhelming!

There are so many types and aesthetics and layouts and elements you can add and modify to the Bullet Journal. Even though that's the beauty of this type of journal, it can get quite overwhelming at times. It's hard to choose what you want to include and what you don't. I suggest adding elements you think you will use and each month trying a new element. I never thought a monthly spread calendar would be useful to me, but after I tried it out, it's my most used and most favorite element in my Bullet Journal.

4 ➤ You don't have to include everything!

You don't have to add each element from the original Bullet Journal Design or the most commonly used ones. Your Bullet Journal should be functional and designed to suit your requirements. So only add elements you will really use. If you know you don't have a busy week and will only be binge-watching a TV show half of the time, don't dedicate a daily log for that week, just have a weekly log.
If you don't watch a lot of TV shows, there's no need to add a TV show log. You get the point, right?

5 ➤ Placement

When I started my Bullet Journal, I didn't properly plan out what elements I wanted to add. I had a rough idea; year spread, TV show tracker, 2017 goals, monthly spreads, etc. I ended up not realizing I had a few more elements to add like "Favorite Quotes" till I finished my first monthly spread. The problem with this was, if I had an element that is just going to be one page and used throughout the year, it should be at the front of the journal, before the monthly logs, etc. My bullet journal became disorganized because of this. So you should plan out which general elements you want to add to the front of the page (so that they are easier to find and your journal looks organized) and add those first. Leave a page or two if you feel like you might have another idea or two to add in those pages. You are going to use your Bullet Journal to be more organized so the journal should reflect that in its structure.

6 ➤ Notebook

One thing I definitely didn't think was a priority when I decided to make a Bullet Journal was investing in a good notebook. I thought it didn't really matter but as I started making my journal more creative and using different pens/markers, there was major bleed through and the paper quality honestly sucks. Definitely invest in a good bullet journal if you are confident you will maintain it for the entire year at least. Though, I do have one thing to say, which is, if you are starting out with a trial mindset (i.e. you are just testing the waters with this new planning technique) then using a random notebook isn't the worst idea. You'll save money and you can make mistakes and not cringe yourself to death (just kidding). If your notebook is giving you too much of a hard time you may not want to make another bullet journal, so that's also another side to the coin. 


Sunday, September 17, 2017

DIY Polaroids! Aesthetic, Looks like the real thing + Way Cheaper!

September 17, 2017 8
Here's an easy and quick tutorial to make DIY Polaroid Pictures that don't require great art skills and looks exactly the same as real ones for much cheaper. My personal favorite DIY!


DIY polaroid pictures

Okay, let me tell you straight up. This DIY has to be my most favorite one yet! It is super easy, requires very little computer knowledge (if you aren't technology savvy), only requires a document-editing software, is wayyy cheaper than buying a polaroid camera + the films every time, and looks literally the same from the front! 5 amazing pros with the only con being...nothing!

P.S. Go to the bottom of this post if you wanna skip the reading and just watch the video!


Without further ado, here's an easy and detailed tutorial to create perfect polaroid picture dupes in about only four (yes, 4!) cents each! (for a mini polaroid. for a larger polaroid, 8 cents only!). For my Indian viewers, that's around 2.5 rupees per mini polaroid (and 5 rupees for a bigger polaroid)!

Disclosure: Some of the links in this article are affiliate links, which means that I get a commission if you choose to purchase after clicking a link. This doesn’t cost you anything, and I only recommend products I love! Thank you for supporting the work I put into this site!

How to edit your photos:
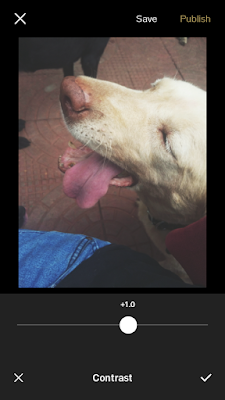
To give the polaroid-like effect to the pictures, I use one of my favorite photo editing apps - VSCO.
Literally all you have to do is add the T1 filter (I like to keep it around +6 only not the entire effect, but that's up to you) and then increase the contrast. Again, it depends from picture to picture how much editing is required to give it the polaroid effect but I usually stick to +1 contrast only. The settings I use give it only a slight polaroid effect so you can adjust them according to what you want.


Also, the colors do look slightly different when it is printed so if you're lucky, your printer will help you achieve the polaroid effect! 

Let's get to the physical stuff now:

The first thing you will need is some glossy photo paper. Preferably, use the same brand as your printer but it doesn't really matter that much. I used the HP glossy photo paper in my Epson printer and it turned out fine. The Epson glossy photo paper, I believe, is cheaper than the HP one in case you want to go for the cheaper option. I used the HP one because it was already lying around, probably from ages ago.


HP premium glossy photo paper

Next, you will obviously need a laptop and any document editing software (Microsoft Word or the apple document editing software. I clearly have no clue what it is called).

Start by first adjusting the paper size and margins. Here are the settings I kept for my specific type of photo paper:

glossy photo paper page size settings

If your photo paper has tabs and you would like to avoid those tabs, make sure to select the size option "with tab" while printing. I did not do this even though my paper had tabs. This is what I did instead: After my first print, I understood which side has an excess margin and made sure the tab came on that side when inserting the paper into the printer. By doing this, I could just break off the tab after printing and the white space in the polaroids would be uniform instead of two having longer white spaces than the other two (you will understand this better when you see how I added the pictures below).

Next, use the ruler feature to create two perpendicular lines going exactly through the middle of the page. Make the lines a light gray color so that if you cut incorrectly, the lines won't be as visible.

dividing word document into four

If the rulers are not visible, then go to the "view" tab and click on the ruler box as shown below:

enabling ruler in word document

Next, add your desired pictures like shown below:

diy polaroid pictures using word


TIP: To ensure uniformity, use one picture and size the other 3 pictures to the same dimensions as the first one. You can crop the picture if needed. Use one picture as a guide so that the placement is exact for the next picture and so that the white space is the same for each "polaroid".

Place your paper in your printer and make sure to adjust the tab in your printer:

how to adjust printer for photo paper

Here is how I set up my print options:

print options

print options for photo paper inkjet printer

Print them and let them dry...

epson inkjet printer

epson inkjet printer

printing polaroids using inkjet printer

Here is what they should look like once you print them out:

aesthetic diy polaroids

Finally, try to cut them out neatly using the gray lines you added earlier as a guide.

TIP: Wait 15 minutes at least before cutting or even touching the paper. Leave it on your desk or somewhere safe. If you scratch the paper, by mistake, before it dries, you will end up moving the ink and you won't be able to fix that. Hence, wait before cutting the paper. Once the ink has dried, scratching won't hurt your picture (unless you aggressively scratch it...which why would anyone do that?).

cutting polaroid pictures

This is the amazing final result! It turned out so pretty and looks legit. I definitely recommend only using glossy photo paper for the same effect and for longevity of your "polaroid pictures". If you use normal printer paper, perhaps consider laminating them so that they don't get ruined by smudge marks or get ripped.

DIY polaroid pictures

cute puppy polaroid picture

cute puppy polaroid picture

DIY polaroid pictures


This is an easy DIY with perfect results (you really can't go too wrong even if you mess up the printer settings) so I hope you enjoy trying it out!

More Ideas!
  • You can add magnets to the back to display on your fridge
  • You can add resin to them to preserve it forever
  • You can print out a large size (either use the entire 4 × 6 sheet or a bigger sheet if available) and glue it stiff foam to make a mouse pad.

If you would like to see the video version of this tutorial for a clearer understanding, click below: